Access Users
Contents:
The Access Users section is used for the management of all Access Users & Guest Users on any internet connected door lock including the 500i, 5i, 6i, 7i and ACS system. ResortLock guests are managed directly from each ResortLock's individual management page.

Access & Guest User creation can be initiated either from an individual lock's management page or via the Access User section. Wherever the creation of an Access or Guest User is initiated, all Access Users will appear in the Access User and Access Guest list views.
Access Users are separated from Access Guests in order to provide clear distinction between users that are given long-term access (Access Users) and those with temporary access (Guests).
Access Schedules can also be created in the Schedules sub-tab to limit access to specific days of the week and hours of the day.
Access Users
The Access User tab shows the list of all Access Users in the account and provides the ability to add additional Access Users.
Add Access User
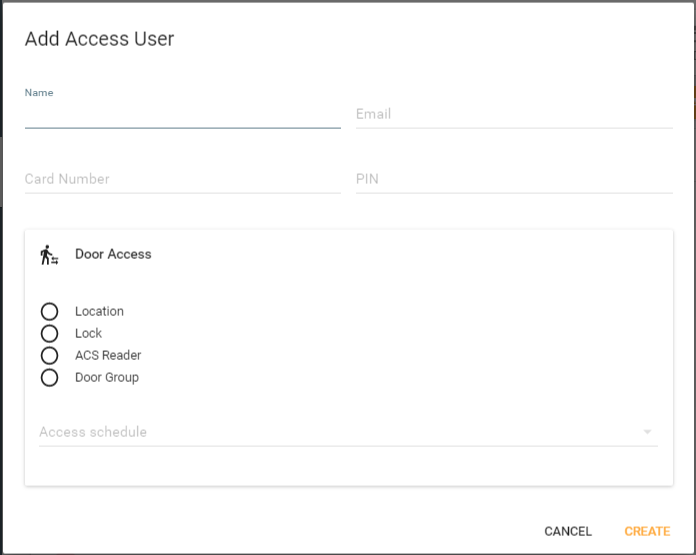
Create Access Users to provide individuals with pin codes or card credentials to doors and locks. To add a new access user, click on the Add Access User button.
Access User Information
Enter the Access User's information.
Name: Enter a name for the Access User. Can be just the first name, or first and last. All names in the account must be unique.
Email: If you enter an email address for the user, an email will be sent with the Access User credentials to the email specified. If any changes are made to the access user, a new email will be triggered with the updated credential.
Card Number: If the Access User will be given a prox card to access a door with a prox card reader (via the ACS system or other lock with prox card reader), enter the card number here. This field should be ignored for pin code only locks and users.
Pin: For WiFi door locks and pin pads, enter a pin # for the Access User that is between 4 - 10 digits in length. All pin numbers must be unique in the account.
Door Access
After entering the User's information, select the type of Door Access to provide.
Location: Click on the Location radial button in order to provide the Access User access to all of the locks and doors associated with a particular location. Once the Location radial button is selected, click on the Location drop-down below to select the specific Location for access. The user's credentials will then be sent to all locks for that property.
Door Group: Select the Door Group radial button to provide access to a specific group of locks and doors. Then select the specific Door Group in the drop-down below. Door Groups must be created prior to this assignment and can be created by going to the Devices main menu, then select Door Groups.
Lock: Select the Lock radial button to provide access to an individual door lock. Then select the specific lock in the drop-down below.
ACS Reader: If you have an account with the Building Access Control System module (ACS), there will be an option to select the ACS Reader radial button. This allows assigning access to a individual ACS door. After clicking the ACS Reader radial button, select the specific door from the drop-down below.
Access Schedule
Finally, an Access Schedule can be selected from the Access schedule drop-down at the bottom of the Access User Screen. Access Schedules are used to limit a users access to the doors & locks they are given access to. For example, an employer may create a schedule for Monday - Friday from 9AM to 5PM each day. Selecting this schedule for the Access User would send this schedule to the lock as part of their credential. When this user's pin number is entered on the lock, the door will only unlock if within the parameters of the schedule.
If providing access to an entire location or group of locks, the schedule that is selected will be sent to all locks and doors within the location or group.
Access Schedules must be created prior to the Access Schedule selection and can be created by going to the Access User main menu, then selecting the Schedules tab.
Access User Conflict Handling
With the ability to assign Access Users to Properties, Groups, individual Locks or multiple Groups within a Location, there is the potential for conflicts to arise. The system has a hierarchy for dealing with conflicts according to the following levels:
- Top Level: Location
- Mid Level: Groups
- Bottom Level: Individual Devices
Access Conflicts
For Access rights, the top level access grant rules.
For example, a user may be given access to an individual lock by being granted access to the Location it is assigned to, then also a group it is assigned to, and then the individual lock itself. If access is later removed to the individual lock grant, the user will still have access because they have access provided to the group. If the grant to the group is later removed, the user will still have access because they still have the Location grant.
Schedule Conflicts
For Access Schedules, the bottom level rules.
For example, suppose a user is given access to an individual lock along with an access schedule by being granted access to a Location that lock is associated with. If this same access user is later granted access to a group containing this same lock with a different Access Schedule, the user credential will be updated on this lock with the new access schedule from the group access grant.
Group Conflicts
For Group conflicts, the last action/save rules.
For example, suppose a user is given access to an individual lock along with an access schedule by being granted access to a group. Then later, suppose this same individual is granted access to a group with a different access schedule and this door group has that same individual lock in it from the previous group. The access on this individual lock is now in conflict. In this case, the system will use the most recent access grant (and its schedule) to resolve the conflict.
Access User List View
From the Access User list view, system users can view, edit or delete existing users.
- To Edit: click the pencil icon right of the Access User row to edit the users information (name and email) and credentials (pin and card #).

To Delete: click on the trash icon to delete an Access User.
To View: Click on the users name to view the Access User and add/or modify their existing access. This will bring up the Access User Management view covered below.
Access User Detail
The Access User Management view provides complete management of an Access User, including the ability to modify their information, credentials, Door Access and view their Access Events.
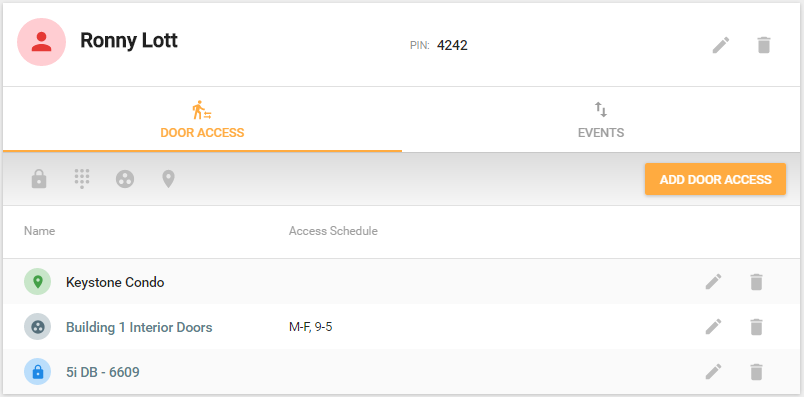
User Information
At the top of the screen is the user's information including Name, Pin, and Card number (if applicable). To edit the User Information, click on the edit pencil to change Name, Email, Pin & Card number.

Door Access List
The Door Access list shows all access currently granted to the user. To add new access, click on Add Door Access and follow the instructions above for Add Access User.
Each access granted in the list is accompanied by a logo to show the type of access granted.
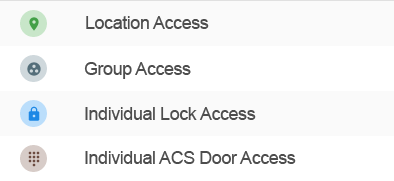
Location Access: Gives the User access to all of the locks and doors associated with a particular location. The user's credentials are then sent to all locks assigned to that Location. If a new lock is added to the Location, the Access User will be automatically added to the new lock.
Door Group: Provides access to a specific group of locks and doors. If a new lock is added to the Group, the Access User will be automatically added to the new lock.
Individual Lock: Provides access to an individual door lock.
ACS Reader: If you have an account with the Building Access Control System module (ACS), this selection will provide access to a individual ACS door.
Edit/Remove Door Access Existing access can be removed by clicking on the trash icon. Existing access can be edited by clicking on the pencil icon. When editing existing access, only the access schedule can be changed. If needing to edit access to the existing lock, group or location, simply delete that access and add the new lock, group or location.
Access User Events
The Events tab within the Access User management view provides the access history for the user, subscriptions for access alerts for the user, and a view of any email or text notifications sent.
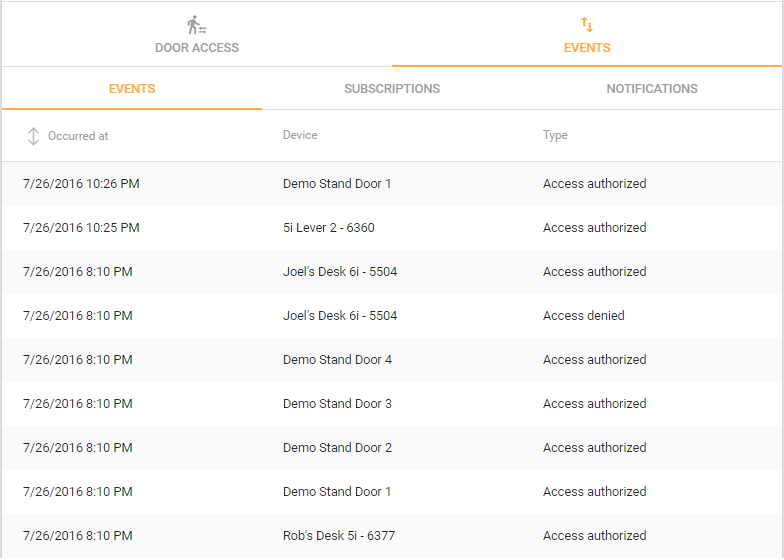
Events
The Events sub-tab shows all access attempts made with the users credentials, the time of the attempt, the door or lock it was made on, and the result of the access attempt (authorized or denied).
For WiFi door locks with the Wake Wifi on Keypress setting enabled (it is enabled by default), events should appear on this view within 10 - 20 seconds after the event takes place on the lock.
Subscriptions

Alerts/Notifications can be set up for an Access User can either be setup here within the Access User management page, or from the global Notifications manager section.
In order to receive a notification when an Access User unlocks a door, account managers need to set a "subscription" to receive notifications to a particular "subscriber". A subscriber can be an email address or cell phone number where the notification is sent.
Before a subscription can be set, subscribers (email addresses or phone numbers) must be previously set up by navigating to the main Notifications section, then selecting Subscribers/Add.
Add Subscription
To setup a notification when the Access User uses their credential to unlock a door, click on the Add Subscription button under the Subscriptions sub-tab.
In the pop-up screen, select the Subscriber type (text message or email), then select the Subscriber from the drop-down. Click on the event type Access Granted, then Create.

Now when this access user unlocks any door they are given access to a Notification will be sent.
Access Guests
Temporary access users can be created as Access Guests. This allows property owners and managers to provide temporary access codes that start and expire on a specific date and time. For example, a rental property owner may want to creat an Access Guest who's code will start working on the lock this upcoming Friday at 4PM and expire 2 days later at 11AM.

Just like Access Users, Access Guests can either be created from an individual lock's management page, or from this main Access Guest section.
Add Access Guest
To add an Access Guest, click on the Add Access Guest button.
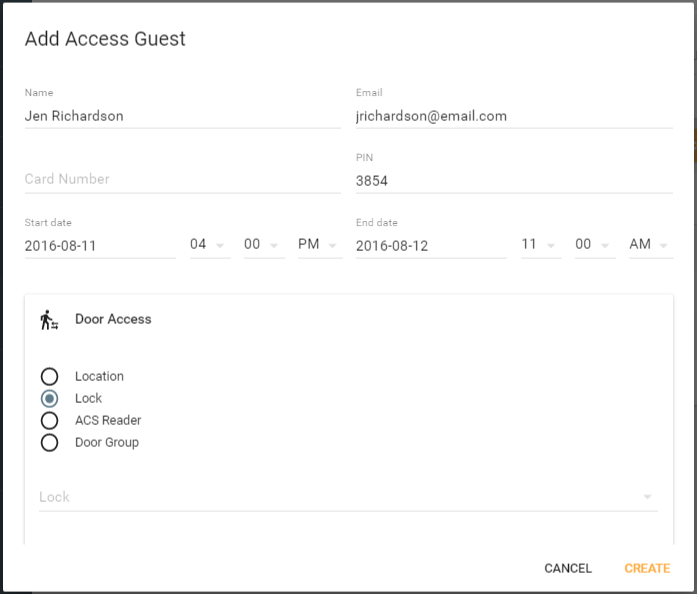
Guest Access User Information
Enter the Guest Access User's information.
Name: Enter a name for the Guest. Can be just the first name, or first and last. All names in the account must be unique.
Email: If you enter an email address for the user, an email will be sent with the Guest credentials and access date range to the email address specified. If any changes are made to the access user, a new email will be triggered with the updated credential.
Card Number: If the Guest will be given a prox card to access a door with a prox card reader (via the ACS system or other lock with prox card reader), enter the card number here. This field should be ignored for pin code only locks and users.
Pin: For WiFi door locks and pin pads, enter a pin # for the Guest that is between 4 - 10 digits in length. All pin numbers must be unique in the account. After a guest code expires, or if a guest code is deleted, that same code can be used again.
Date Range

Next click on the date and time ranges to select the specific starting date and time, as well as the ending date and time. This will limit the code to work only within this range.
Door Access
After entering the User's information and date range, select the type of Door Access to provide.
Location: Click on the Location radial button in order to provide the Guest access to all of the locks and doors associated with a particular location. Once the Location radial button is selected, click on the Location drop-down below to select the specific Location for access. The Guests's credentials and active date range will then be sent to all locks for that property.
Door Group: Select the Door Group radial button to provide access to a specific group of locks and doors. Then select the specific Door Group in the drop-down below. Door Groups must be created prior to this assignment and can be created by going to the Devices main menu, then select Door Groups.
Lock: Select the Lock radial button to provide access to an individual door lock. Then select the specific lock in the drop-down below.
ACS Reader: If you have an account with the Building Access Control System module (ACS), there will be an option to select the ACS Reader radial button. This allows assigning access to a individual ACS door. After clicking the ACS Reader radial button, select the specific door from the drop-down below.
Access Schedule
Finally, an Access Schedule can be selected from the Access schedule drop-down at the bottom of the Guest Access Screen. This is optional and less common for Guest Access users. Access Schedules are used to limit a users access to the doors & locks they are given access to and can also be applied to Guests. For example, an employer may create a schedule for Monday - Friday from 9AM to 5PM each day. Selecting this schedule for the Guest would send this schedule to the lock as part of their credential. When this user's pin number is entered on the lock, the door will only unlock if within the parameters of the schedule.
If providing access to an entire location or group of locks, the schedule that is selected will be sent to all locks and doors within the location or group.
Access Schedules must be created prior to the Access Schedule selection and can be created by going to the Access User main menu, then selecting the Schedules tab.
Note: Access schedule application for Guest Access users does not work on the 500i. This feature is compatible with the 5i, 6i, 7i and ACS system.
Schedules
The third tab within Access Users is the Schedules tab. Access Schedules are used to limit a users access to the doors & locks they are given access to. For example, an employer may create a schedule for Monday - Friday from 9AM to 5PM each day. Selecting this schedule for the Access User would send this schedule to the lock as part of their credential. When this user's pin number is entered on the lock, the door will only unlock if within the parameters of the schedule.
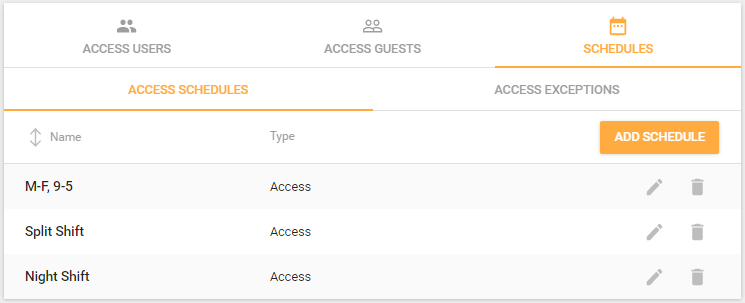
Access Schedules
The first sub-tab under Schedules is Access Schedules. This tab shows a list of all existing schedules that have been created in the account, the option to edit them and create new Access Schedules.
Add Access Schedule
To add a schedule, click on the Add Schedule button. A pop-up window will appear with the Schedule Creator.
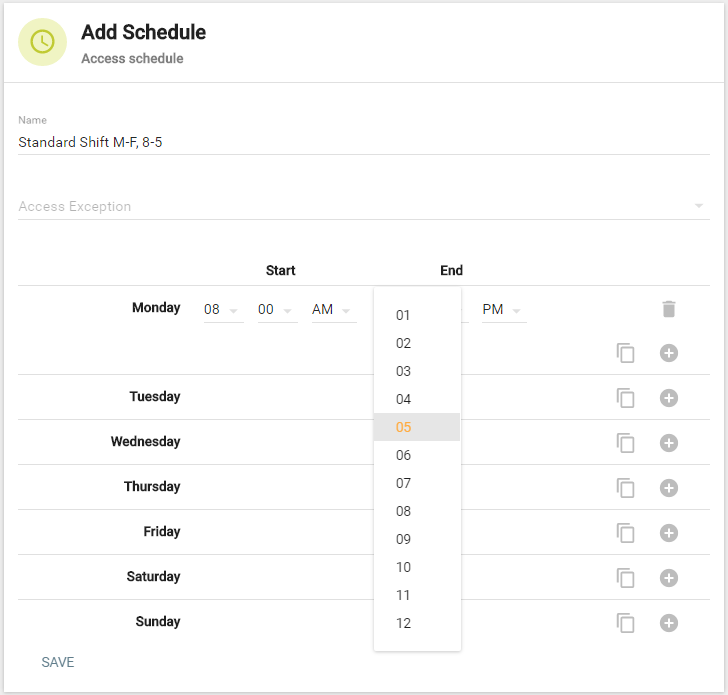
Create a new schedule by entering the following:
Name
Select a unique name for your schedule. It also helps to include some detail about the schedule so it can be easily identified when applying to an Access User.
Access Exception
Access Exception schedules, also known as Holiday schedules, are optional and can be applied to an Access Schedule in order to restrict access during certain days. For example, a business may be closed on major US Holidays. So an Access Exception schedule can be created to include all of these dates. These can then be applied to an Access Schedule in order to deny access on these dates.
Help on creating Access Exception schedules is below.
Daily Schedule
Use the schedule creator to set access for each day of the week. Each access entry should have a starting and ending time. Multiple time ranges can be created for each day. For example you can create a split shift for each day. In this case you would have two time ranges for the day. Each day can have up to 4 time ranges.
Schedule Creator Controls
The Access Schedule creator start with a template for each day of the week. Leave a day empty to completely restrict access for that day. Each day can have up to 4 time ranges. Below is an example of the schedule Monday - Friday, 9AM to 5PM.
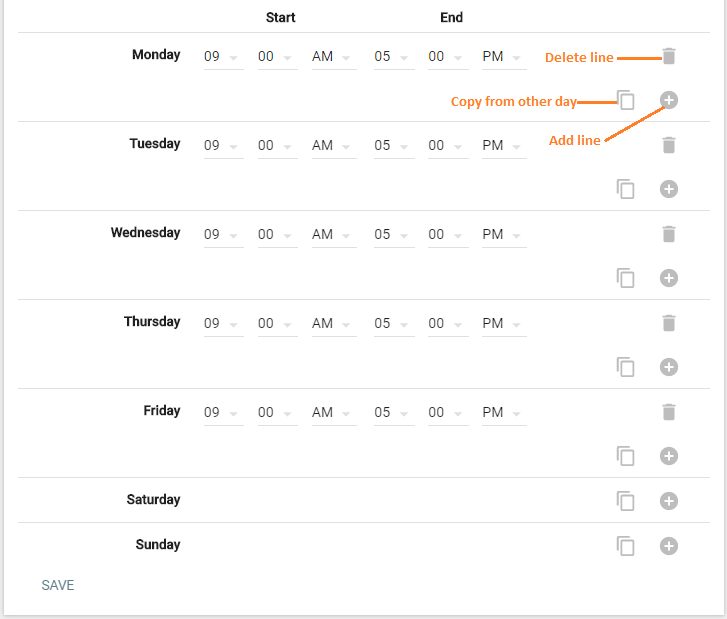
To add another schedule line within a day, click on the plus sign. To remove a line, click on the trash icon for that row. If you have a daily schedule created that you would like to copy to other days, click on the Copy icon on the day you want to copy it to and select the day to copy it from.
Access Exception Schedules
The second tab under Schedules is the Access Exception Schedules. This tab show's a list of all existing schedules that have been created in the account, the option to edit them and create new Exception Schedules.

Access Exception schedules, also known as Holiday schedules, are optional and can be applied to an Access Schedule in order to restrict access during certain days. For example, a business may be closed on major US Holidays. So an Access Exception schedule can be created to include all of these dates. These can then be applied to an Access Schedule in order to deny access on these dates.
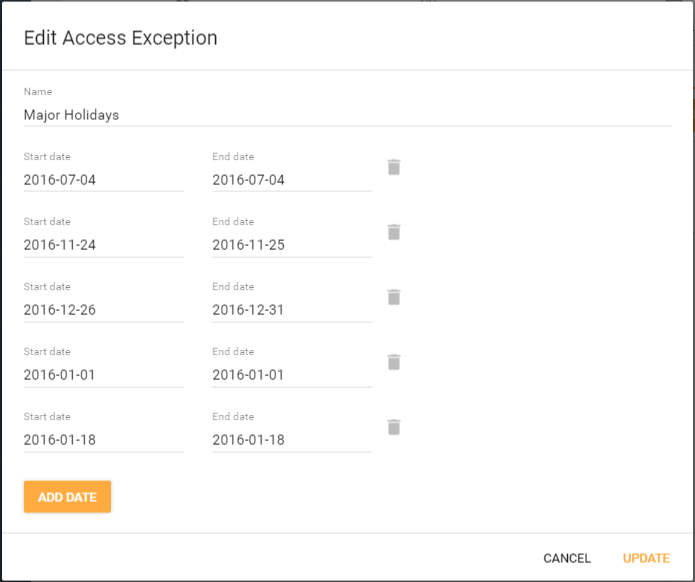
Add Exception Schedule
To add a schedule, click on the Add Access Exception button. A pop-up window will appear with the Schedule Creator. Important information for Exception Schedules:
- The maximum number of dates/date ranges in a schedule is 40.
- If an Exception is created for a single day, enter the same day on the Start date and End date
- The exception prohibits entry for the entire day(s) specified, starting at 12:00AM and ending 24 hours later