Device Management
Contents:
Devices:
From the Device Management tab, you can create and manage your connected devices, create and manage Door Groups, and create and manage your Device Schedules.

Device List View

To create and manage your devices, select the Devices tab from the upper menu. This will give you a list view of all your devices (not including ACS doors if you have the ACS module) as well as a filter bar and the Register Device button.
Filter Bar

By default the Device List View will show all devices in your entire account. If you have many devices across several locations, you can use the Filter by Location drop-down to filter the list view to only show devices from a specific location.
The Device Type filter can also be used to show only one specific type of device, such as locks or thermostats.
To Add & Register a new device to your account, click on the Register Device button on the right side of the filter bar. Select the type of device you are adding, then select the model number of your particular device.
Device List
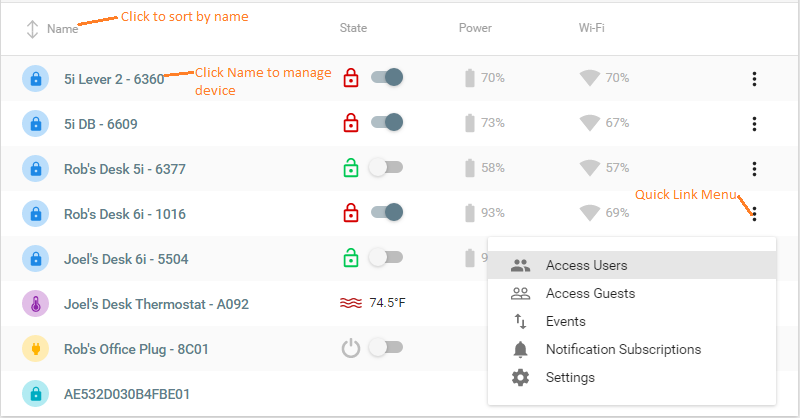
Name
Click on the Name column header in order to sort your devices alphabetically by name.
To manage the settings or other aspects of a particular device, click on its name to get to the Device Detail view for:
State
The State column will show you the current state for each device in the list. For door locks, you will see a red lock icon to indicate that the door is in the locked position and a green lock icon to indicate it is in the unlocked position. The slider can also be used from the Device List view to change the current state of the device. For a door lock for example, you can click on the slider to send a command to lock or unlock the door.
Power
For devices that are battery powered like WiFi connected door locks, the Power column will display the last reported battery level.
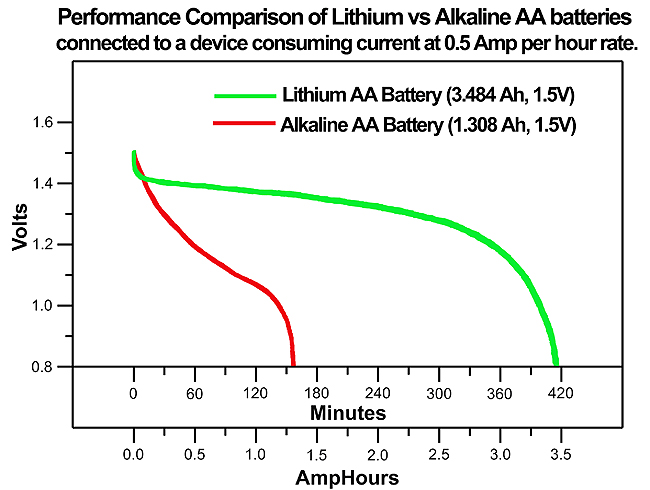
Note on Battery Level: The displayed strength of the battery level assumes alkaline batteries are being used in the lock. Any reading above 6 volts will be displayed as 100% and a reading of 3.5 volts is displayed as 0%. As you can see in the example graph below, the typical discharge curve for Alkaline batteries is very predictable and smooth. Compare that to Lithium batteries that hold a high voltage for a much longer duration but then fall off a cliff when close to end of life. As a result, the displayed battery life within the application cannot be used reliably with lithum batteries.
Quick Link Menu
On the right side of each row on the Device List view is the Quick Link menu icon (3 vertical dots). Use this for one-click quick access to sections within the Detailed Device View.
Door Groups
Door Groups allow administrators to easily provide Access Users or Guests access to several doors at once. For example, if you have several locks for your office you may want to create a group to include all of those locks so you can quickly give employees access to all doors at once. Once an Access User or Guest is given access to that group, then their code will be added to each individual lock within the group.
*Please note, door groups are only available to users with a Pro Account plan.
Door Group Behavior
There is no limit the the number of groups that can be created. An individual lock or door can also be included in multiple groups. However, be careful about providing an access user to two separate groups that contain the same lock. If you specify different access schedules for the same user on each group, our system will assume the last schedule specified is the one that should be pushed to the conflicted lock in this scenario.
Once an Access User is given access to a Door Group, any change made to the group will update the users access to the group. For example, if a new lock or door is added to a group, all access users already assigned to that group will be sent to the new lock. The same is true when removing a lock or door from a group; all access users assigned to the group will be deleted from that lock upon removal.
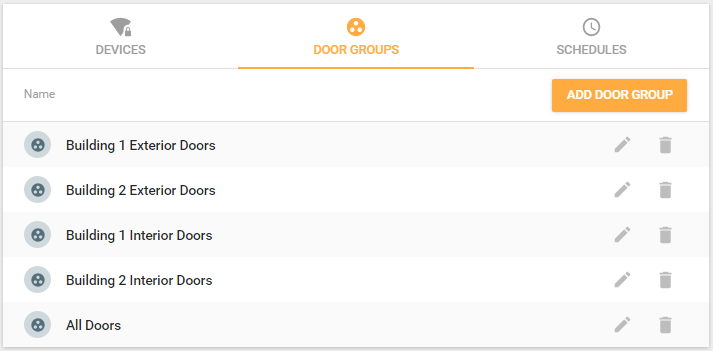
Adding a Door Group
To add a door group, click the Add Door Group button in the upper right. You will then bee presented with a list of all locks and doors in the account. Check the box next to all locks that you want to add to the group and then press save.
Editing a Door Group
To Edit a Door Group, click on its name in the list view. You will then be presented with a list of all locks and doors in the account along with check marks for those already included in the group. Add new locks to the group by checking them, or remove by unchecking. Click Save.
Device Schedules
To state the obvious, Device Schedules are schedules that are applied to devices. Using Device Schedules is a two step process. The first step is to create a schedule for a device type (lock, thermostat, plug), then to apply that schedule to the device within the Settings of the device itself. Multiple schedules can be created and saved for each device type. Those schedule can later be edited or deleted from the Schedule List view below. If a schedule is edited, it will be updated on all devices that the schedule is applied to once saved.

Add New Schedule
To add a new schedule, click the Add Schedule button from within the Schedules section. Name your schedule and then select the type of schedule to be created. There are 4 types of device schedules that can be created from this screen; Auto-lock & Lock Action (both for door locks), Power Plug and Thermostat. Descriptions of each are below.
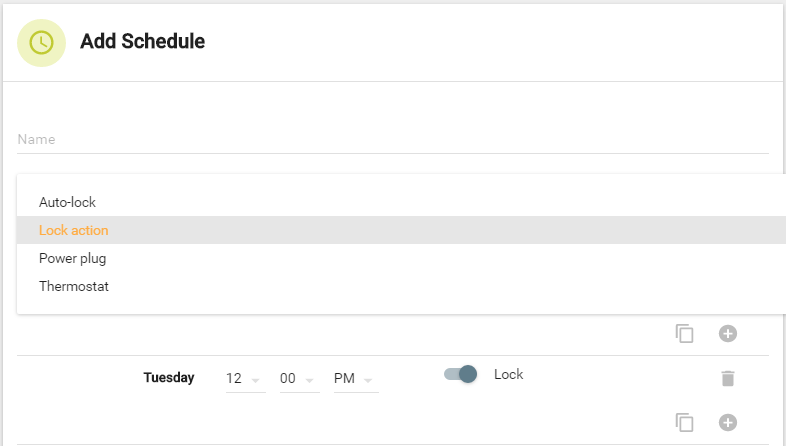
Schedule Creator Controls
All Device Schedule creators start with a template for each day of the week and one entry per day. All schedules can have multiple change points per day. For example, on a single day a Plug schedule may switch between on and off up to 7 times in one day.
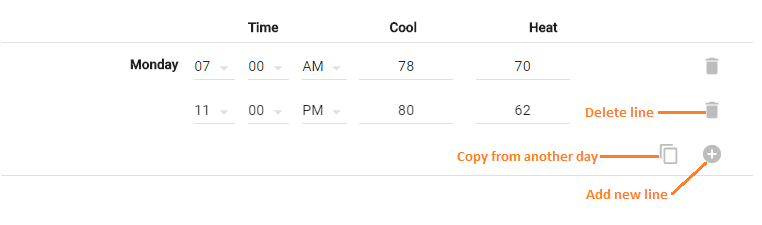
To add another schedule line within a day, click on the plus sign. To remove a line, click on the trash icon for that row. If you have a daily schedule created that you would like to copy to other days, click on the Copy icon on the day you want to copy it to and select the day to copy it from.
Auto-lock Schedule
Also known as a Passage schedule, Auto-lock mode determines whether the door lock is re-locked automatically after unlocking. If in Auto-lock mode, after the door is unlocked with a user code it will then re-lock 5 seconds later for example. This setting only determines what happens after a door is successfully unlocked.
In the lock's settings, Auto-lock mode can be set to On, Off, or Schedule. The schedule option allows users to switch between Auto-lock being enabled and disabled during different parts of the day. For example, an office may want their lock to go into passage mode (Auto-lock off) at 8AM. The first employee to unlock the door after that point will cause the door to remain unlocked. Then the office could set the lock to go into Auto-lock mode at 5PM so it will re-lock anytime accessed after that point. Each day can have up to 6 different changes in mode.
Lock behavior when setting new Auto-lock schedule
Sending the Auto-lock schedule to the lock will not change the lock's current lock/unlocked state. Again, the Auto-lock setting only effects what happens after the lock is successfully unlocked by a user credential.
Additionally, the Auto-lock mode will ONLY change when a schedule change point is reached. For example, if you set a schedule with Auto-lock mode turning off (Passage Mode) between 9AM and 5PM, and the lock receives this schedule at 9:05AM, the lock will not be put into Passage Mode until the next day at 9:00AM the following day. If this is a concern, set the lock to the mode you want it in first, save that setting, then set the schedule on the lock.
Lock Action Schedule
The Lock Action schedule is applied to door locks and sets specific times for the door to lock or/and unlock automatically. Each day can have up to 6 different lock/unlock changes. In the example above of the office, they may want to apply a Lock Action schedule in addition to the Auto-lock schedule to automatically lock the door every day at 5PM. This ensures the door locks at the end of every day. Or a gym may want to automatically unlock their door Monday thru Friday at 8AM and lock at 5PM.
Once a Lock Action schedule is created, it can be applied to a lock on its lock settings page.
Note on Lock Action Schedule behavior on the lock:
Please note that the lock may not lock or unlock at the exact moment the schedule is set for. It may be delayed by a maximum time of 4 minutes. This is because the lock's processor sleeps for 4 minute intervals to conserve battery. So the lock action schedule point could have occured while sleeping. When it wakes, it will see this event needs to be executed, and perform the action.
Power Plug Schedule
Create schedules to turn power plugs on and off automatically at specific times of day. For example, set a front hall lamp to turn on every day at 6PM and off at 10PM. Or create a variable schedule for when you are on vacation for added security. Each day can have up to 7 On/Off changes.
Once a Power Plug schedule is created, it can be applied to a plug on its plug settings page.
Thermostat Schedule
Create Heat and Cool programs to save energy in your home. The thermostat schedule creator allows you to set both the heat and cool programs in one schedule.
Thermostat schedules can have up to 4 program changes per day. Once a Thermostat schedule is created, it can be applied to a thermostat on its settings page.
Common Door
A Common Door is a lock or reader that has automatic shared User/Guest access with another door or all doors within a location. If a particular lock/door (door 1) is made to be "common to" another door (door 2), any user code or guest code added to door 2 will be automatically added to door 1. This is particularly useful in situations where there is an exterior building common door and several interior doors. Setting the exterior door as common to the interior doors will ensure that any user added to an interior door will also be added to the exterior so they can access both locks.

Add Common Door
Common Doors are composed of a "common" lock or an ACS Door and a lock or location which the previous lock is "common to". When an Access User or Access Guest code is created for the "common to" lock, that code is also automatically granted access on every associated Common Door. Multiple common doors can be created for the same target lock by creating multiple entries leading to the same "common to" door.
To add a Common Door, click on Add Common Door under the Common Doors tab within the Devices menu.
Select Common Door
The first setp in adding a common door is to select the door you want to make common to another door or all doors within a location. This will be the door that acts as a slave to the door(s) it is made common to.
Select Common To
There are two choices in the Common To selection:
Location
If Location is selected, then any user code added to any of the locks within the location will also be added to the common door.
Door
If selecting Door, then any user code added to this individual door will also be added to the common door.
Access Schedule (Optional)
Access schedules can be applied automatically to the Common Door for your User/Guest by selecting a schedule. For example, maybe there is a door for the gym or pool and there is a need to restrict access to those areas to 8AM to 10PM. If this access schedule is selected for the Common Door, then any access user added via the Common Door link will be restricted by this schedule.
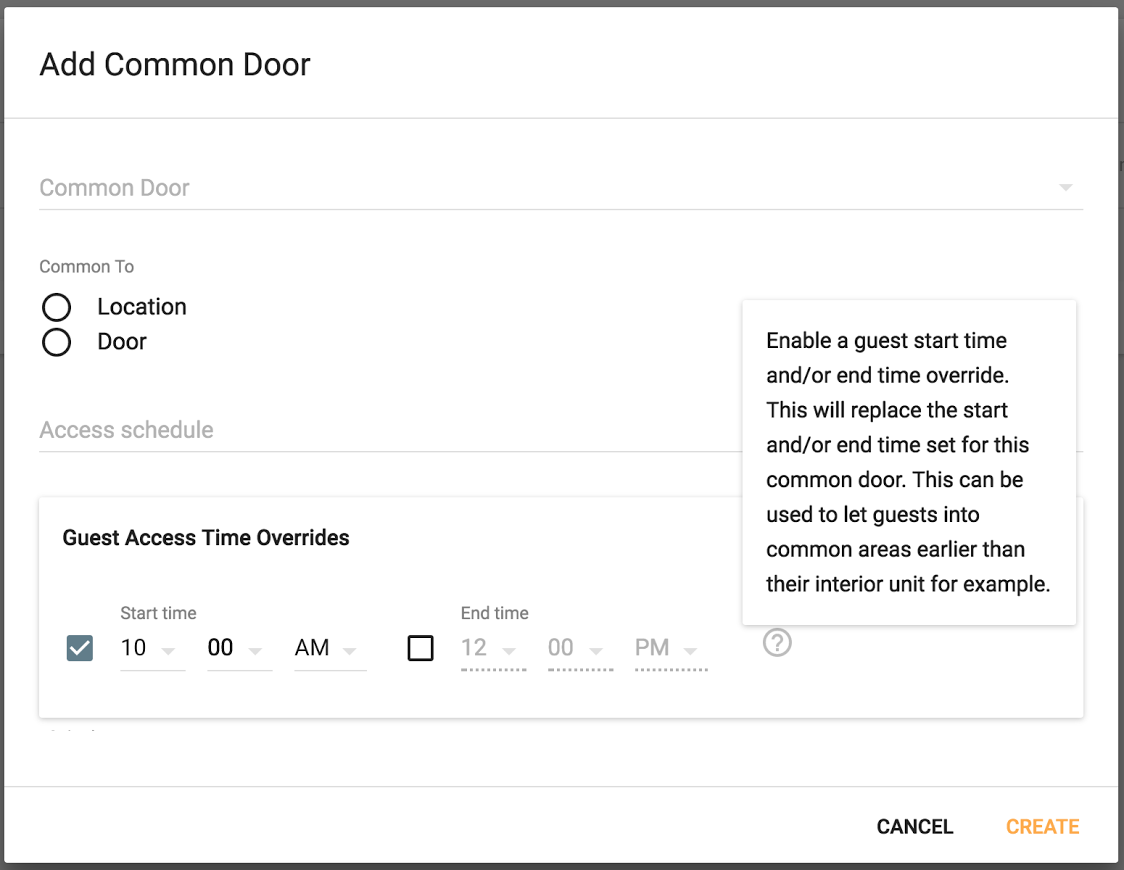
Guest Access Time Overrides (Optional)
Guest Access Start and End time options will override the Guest start/end time from the original guest code restrictions. This option is only applicable to guest codes. User codes added via the common door option will not have Guest Access Time Override applied.
Overrides can be used to let guests into common areas earlier than the "common to" lock/reader. For example, if you have granted access to a guest for their interior unit door at 4PM, but want to provide access to common areas at noon, this can be done automatically via the Time Override.
Options exist for both the start time override and the end time override. One or both can be utilized. The end time override can be used to extend guest access to common areas beyond the expiration of their interior (common to) door.
Please Note: Currently it's not possible to update these fields once created and the door access will need to be deleted and recreated if edits are wanted.**